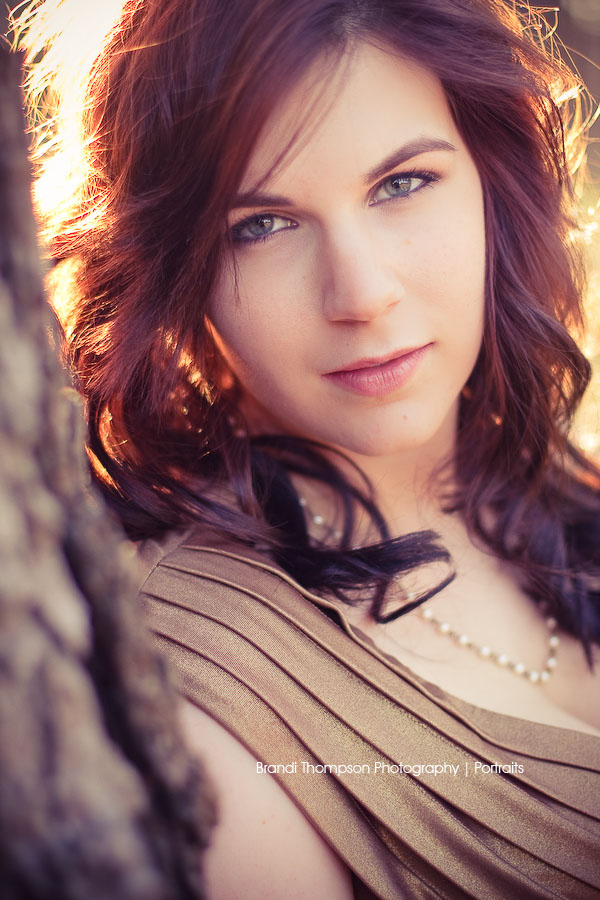
I had several people ask me about the editing I did on Morgana’s session that I posted recently. As far as my editing goes, in general, I edit an image ‘from scratch’ in LR and then I will synchronize* images and do any tweaking. I do not use actions and I rarely, rarely use other people’s presets. I decided to do a bit of step by step for you guys on creating the look I used for Morgana’s session.
*To synchronize your images, select the image you want to copy settings from, then hold down shift or control to select additional images. After your images are selection, hit cntrl + shift + S and voila!
I’m still in the stone ages, and I’m using LR 2, so if you have a newer version, it might look slightly different!
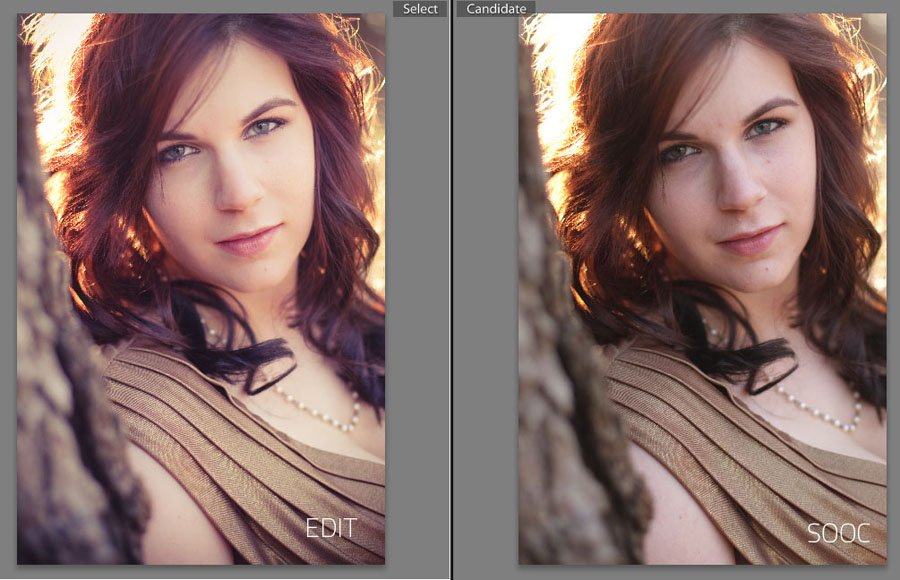
Here we have a side by side comparison of the finished image and the SOOC image. This is true SOOC, camera neutral. I always start my images in camera neutral, just because I’m a control freak like that. You can change your camera profile all the way at the bottom of the develop pane, under Camera Calibration.
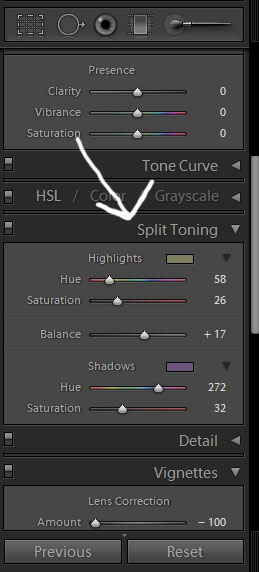
Okay, I’m not going to fool around here. I’ll give you the #1 key to this look right off the bat. Scroll down your develop pane until you see the section called ‘split toning’. In the highlight section, choose a yellow/golden color and in the shadows section, choose a blue/purple color. Adjust the balance and saturation until you get the look you like! Remember, you can always come back to this later to adjust it more after you adjust the rest of your image; or you could do it in order from the top down (which is how I normally do things) and you’ll have a better idea of how your finished image is going to look.
The additional things I did for this image were:
Adjusting the white balance (removing magenta, and actually toning DOWN the warmth in the image since I actually shot these images with shady WB to create a warmer look).
Giving the image a vignette with Lens Correction. I went much stronger here than I normally would.
Added just a hint of brightness, contrast, clarity and vibrancy.
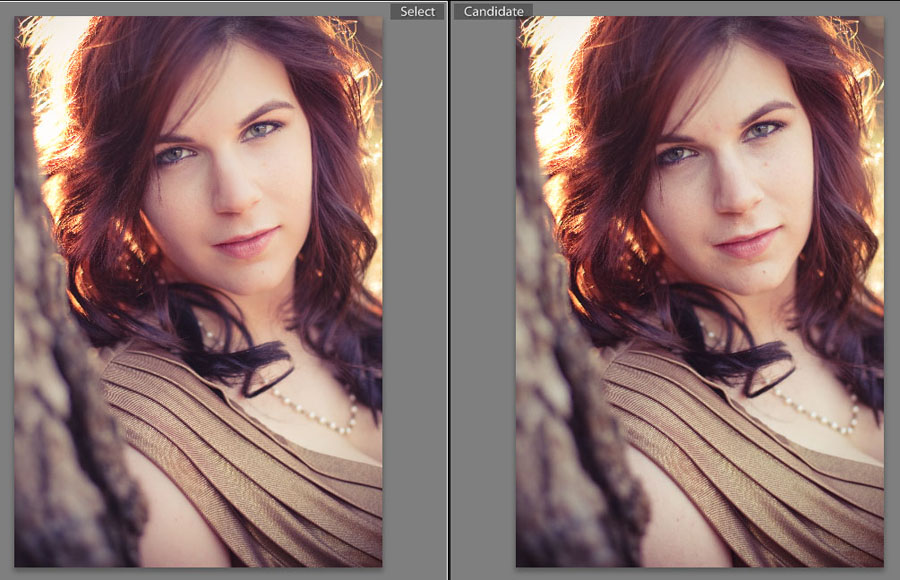
Boosted the lights and brought down the shadows on the tone curve. We’re going to talk about that more in just a moment. So here’s my image now:
We’re getting pretty close! I wanted to talk about the tone curve for a moment. People actually ask me a lot about my ‘colors’ and I how I get them the way they are. First, try and find the best light! Good light generally means the easiest time finding nice colors in your finished images. After all, color is nothing more than refracted light, right? Second, I don’t really do much to ‘pop’ colors, normally, if my light is ideal. But, adding a little bit of contrast does help give you that depth to your colors. And while I do like to use the actual contrast slider a little bit, the tone curve is really where it’s at, especially if you have a backlit image or any haze at all.

With the tone curve you can control highlights, lights, darks and shadows. Normally (like I did here) I go for Lights and Shadows first. Negative makes it darker, positive makes it brighter. So, I normally bring down shadows and sometimes darks, and I boost the lights. I normally don’t touch the highlights. If you have a backlight image, especially with any haze, you will find that bringing down your shadows, especially, will help add contrast to your image without having to boost all your lights as well. So keep this in mind. It’s very similar to a curves layer in Photoshop!
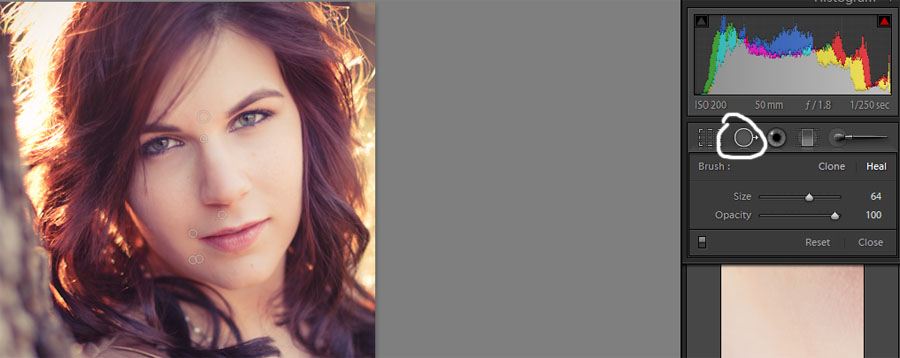
So, now we have our mostly finished image. Looking pretty good! But, it still needs those finishing touches. Photoshop, right? Nope! You can do beauty touch ups in Lightroom as well. First, hit the clone tool to take out any blemishes. Morgana had absolutely gorgeous skin, but we just had a few tiny spots to zap to make it flawless. You can either just click over the spot and let Lightroom pick a sample to clone with, or you can drag your circle to select your own sample, which is what I normally do. Now, Lightroom does not blend as well as Photoshop’s healing tools, but normally I find I can fix most blemishes this way.
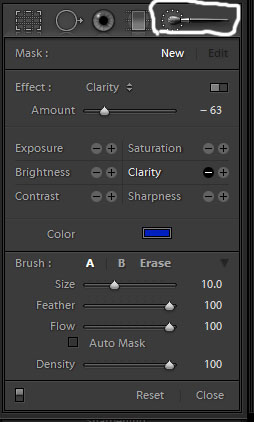
After I take out any blemishes with the clone tool (also works great if there are specks of dust or lint on a piece of clothing that got missed) I finish off the image with a little skin smoothing and a tiny bit of brightness in the eye area. To do this, hit your adjustment brush down at the end (the paintbrush) and you’ll get a menu of different things you can spot adjust. Brightness and clarity are the ones I use the most. Select the negative clarity brush and dial it down anywhere from about 60 – 100 (depending on how much oomph you need) and paint on the areas that need smoothing. Then hit your plus sign on brightness and do the same for any areas that need that. A little brightness goes a long way so keep your numbers low or it will look unnatural.
After all that, we have our finished image!
I hope you enjoyed this tutorial and if you have any questions or there is something you’d like to know more about, please let me know. I don’t claim to be a Lightroom expert but I am happy to share what I know.
Previous Post
Maternity Session Tips! - Dallas Maternity Photography
Next Post
Zaida's Little Red Riding Hood One Year Photos
2 Comments
Thank you for sharing! This looks great, I can hardly wait to try it out!
Such a gorgeous image, Brandi…really enjoyed your walk through! Thank you for sharing it.